Creating scenario flows
Wichtig
The functionality described in this article is only available if you install the French version of Document Output. In Microsoft Marketplace, it's called Continia Document Output (FR).
A scenario flow is a set of rules that tells eDocuments Scenarios what extra information to put into an eDocument when you post it. You set it up once, and the system then fills in the right data for you. This article describes how to set up a scenario flow, step by step.
Each scenario flow is built from the top down: Flow > Sets > Business terms. You can think of it like folders: a flow holds a number of sets, and each set then holds a number of business terms. Each business term is one small piece of data (such as "payment terms" or "tax type").
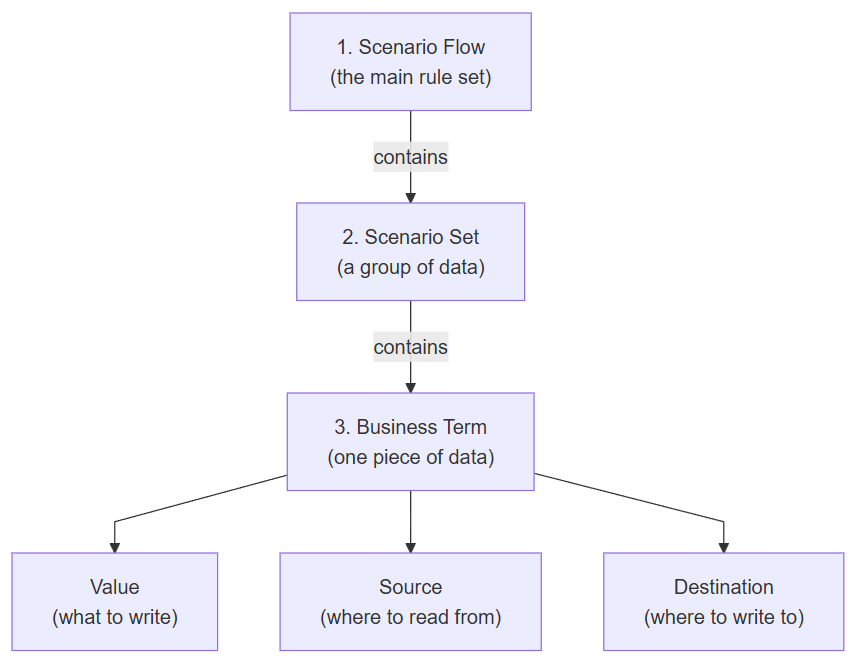
To create a scenario flow
In order to create a new scenario flow from scratch, follow these steps:
- Search () for and select eDocument Scenario Flows.
- In the action bar, select New. A new row is added to the table. Fill in the fields:
Code: Add a short name for the flow, such as
FR-INVOICE.Description: Add a longer and more descriptive name or phrase that's readable.
Related Source: Select Sales, Purchase, or Service, depending on the type of documents the scenario flow applies to.
Header/Line: Select Header (whole document) or Line (single lines).
Specific Application: Leave this empty in most cases. Select Prepayment only for prepayment invoices.
Special Payer Type: Leave this empty for normal cases in which the usual customer pays.
Note
If someone else pays, select one of the options:
- Factoring Company: A finance company should get the payment.
- Buyer's Agent: Someone buys on behalf of the customer.
- Seller Agent: Someone sells on behalf of you. Also fill in Seller Agent Code.
- Third Party: Another payer is involved.
Seller Agent Code: Only use this when Special Payer Type is Seller Agent.
Automatic Billing Framework: Select this if you want the system to use the eDocument Line Type Mappings settings to assign the correct values.
Blocked: Select this to stop this flow from being used.
- In the action bar, click Scenario Sets to open the Scenario Flow Sets page.
- Add one line for each set you want in the flow, and then fill in the fields:
Scenario Set: Select a group of data.
Tip
If you're missing specific groups of data, you can create new ones on the eDocument Scenario Sets page. A set is just a group of related data, so you can use the same set in multiple flows.
Order: Enter a number to specify what number the scenario set should have in the flow.
- Click the text in the Scenario Set Description column to open the eDocument Scenario Set Business Term Codes page.
- To add a business term to the scenario set, select an empty row in the table, and then fill in the fields:
Business Term Code: Select the piece of data you want to add.
Default Value: If the value is always the same, enter a fixed default value. Alternatively, set up source field mapping, as described in steps 7-9 below.
Is Mandatory: Select this if the value must be filled before posting.
Tip
If you want to add a business term that doesn't yet exist, you can create a new one.
- If there's no fixed default value in step 6 above, set up source field mapping: In the action bar, click Actions > Edit Code Mapping to open the mapping page.
- On the Source FastTab, do as follows:
- In Source Table ID, enter or select the Business Central table that holds the value. This should be the document header, as lines aren't supported.
- In Source Field ID, enter or select the actual field with the value.
- If the value is reached through a related record, go to the Related FastTab and do as follows:
In Related Table ID, enter or select the Business Central table that holds the related field.
In Related Field ID, enter or select the actual related field.
Note
These fields are used when the value you need isn't in the first table (the one in step 8 above), but in another table it points to. For example, a document line may have a payment terms code, while the real text you want is in the Payment Terms table.
- Repeat steps 6-9 for any additional business term you want to add to the scenario set.
You've now created a scenario flow that's ready to be applied to a document.
To create a new business term
If you need a business term that doesn't exist yet, you can create a new one. To do so, follow these steps:
Search () for and select eDocument Business Term Codes.
In the action bar, click New. A new row is added to the table. Fill in the fields:
- Code: Add a short name for the business term, such as
BT-1234. - Description: Add a longer and more descriptive name or phrase that's readable.
- Code: Add a short name for the business term, such as
In the action bar, click Business Term Values to specify the list of allowed values and the text to write for each one.
In the action bar, click Source Field Mapping to specify where to read the value from (a table and a field).
Note
On the Business Term Source page that opens, the Source Table ID should be the document header, as lines aren't supported.
In the action bar, click Destination Field Mapping to specify where to write the value to in the eDocument.
You've now created a new business term that can be added to a scenario set, as described above under To create a scenario flow.
Related information
eReporting for France
Managing Electronic Documents in France